Showing posts with label Kitchen Plan. Show all posts

Wednesday, March 27, 2013

Still More Bricks

Well we reached the end of day 3 of making the foundation bricks. Well we successfully laid up another 167 bricks today. So that will bring our total foundation bricks made to date up to 429. That's the good news.

The bad news is that my boys just don't get laying the bricks in straight lines.
You can see the row of bricks on the right side. That was the first row they laid. This was after I had already talked to them about where to lay the bricks down and in what direction. There is a time to be creative but, when you're trying to get the most efficient use of space is not the time to be creative. For those of you who have teenagers you know what I'm talking about.

So after laying the first row and having yet another discussion they corrected hings and began laying the second row on the right. Not too bad of news but, this is were it starts.

The second part of the bad news is that I ran out of lime. I had 2 50 LBS bags of lime slacked and ready to use for this and I ran out. As it turns out since I was adding lime by volume rather that weight I needed more than I thought. So I have to get some more lime and slack it for at least 24 hours before I use it. That shouldn't be to hard since I ran into another issue as well.

The third part of the bad news is my other issue. For those of you that have read my blog from the beginning know that when I got the cement mixer the barrel of the mixer failed very shortly after I started using it. I had to take it all apart and weld the barrel back together to fix the failure. Well after all of batches of adobe/cob that I have mixed it seems that a weld or two has started to crack. So I think tomorrow I'll get the lime and put it in the can to slack it and then work on the cement mixer over the weekend. That way the lime has time to slack and I can use the down time to tear apart the cement mixer, check everything and make any repairs needed. This way I'll have my cement mixer back in top shape and ready for the next 1000 plus bricks that I need to make.

I'm planning on making making concrete counter tops as well plus an adobe floor so I'll need that cement mixer running. I'll post more about what happened to the cement mixer so that anyone else using one will know what to watch out for.

Monday, March 25, 2013

More And More Bricks

Like I said at the end of my last post a mixer paddle in the cement mixer broke and was going to have to be welded before we started this morning. So this morning I went out and started to take out the broken mixer paddle pieces. To my surprise I found that the second mixer paddle had also broken away  from the bottom mounting tab. So with that I pulled both of the mixer paddles and their mounting tabs. Then it was on to cleaning them up, aligning them and welding them together. Just to be on the safe side I added a little bit of reinforcing weld on the 1 mounting tab that had not broken. Then I remounted the mixer paddles in the cement mixer. I had to run some errands and we ate a late lunch after I got back.

I ran a bunch of straw through the shredder also and filled a large black contractor trash bag full of the shredded straw so I wouldn't run out. Yesterday I ran out of straw on the last batch. I had just enough for the batch but, that was it. So today I shredded more to make sure that I wouldn't run out.

So by the time we actually got started it was about 3:30 PM MST. Since we (Charles, Jason and me) had all been working yesterday and all day today we decided to mix and lay up bricks for about 2 hours.

So here are all the bricks laid up from day 1 and day 2. In total we've laid up 262 bricks. Yes I know my boys can't lay bricks down in a straight line. We've honestly only worked on laying up the bricks for about 5 hours total between both days. That's an average of over 50 bricks an hour. Not too shabby for just 2 of us at any given time. I've been running the mixer and setting up the mixes and either Charles or Jason have been laying down the bricks. Maybe we'll spend a few more hours laying up the bricks next time. It should only take 1 or 2 more days to make all of the foundation bricks.

Friday, March 22, 2013

Laying Up The Foundation Bricks

So here we are again making bricks. As I said at the end of my last post I had saved all of the clay soil that I had dug out of the foundation trenches. I piled all of it up by the mixer to use it for making bricks. I figured why go haul the clay soil from the other side of the property when I had so much from digging the foundation trenches.

Ok we (my son Charles and I) got ready to start this morning and I found that my shredder / mulcher wasn't working. So I had to work on the shredder. I ended up having to replace the switch in order to get it working. Once I got the shredder working I was ready to start making bricks. Yeah, that didn't happen. I found that one of the mixer paddles in my cement mixer had broken. So I had to pull out the welder to fix the broken mixer paddle. Once that was done then we could finally get to making the foundation bricks.

So I did a little math to decide how much slacked lime to use. In order to get the 5% - 7% of lime in the mix to be able to get lime stabilized adobe bricks I needed about 1 gallon of the slacked lime. I used a coffee can that was just under a gallon. So I had to use 1 full can of lime and a second can about 1/4 of the way filled. I also found that if I added some water first then added the lime before anything else, then the lime would get fully mixed into the water. Then I added the sand to the mix. This allows for the lime to be thoroughly and evenly mixed throughout all of the adobe mix. Once the line and 2 buckets of sand were mixed I would then add 1 bucket of the clay soil and 1 bucket of the shredded straw. I kept mixing until everything was mixed well adding water only as needed to keep the consistency of the mix. I wanted the mix to be fairly stiff and sticky like frosting but, with just a little slump so that it would release from the mold.

Even after all of the issues that we had to deal with in the morning we were able to get 141 bricks laid up in the afternoon. We called it quits about 5:30 PM MST. I mixed 7 loads in the mixer and Charles pressed the bricks into the form to lay them down. You can see Charles standing with all of the bricks in the picture.

The one downside to the day was that on the last batch I mixed up the mixer paddle broke again. So tomorrow morning I'll have to pull the pieces out and weld them up then reinstall the mixing paddle before I can start mixing more batches tomorrow. My thanks to the gods for the inspiration that lead to the creation of the electric wire feed arc welder. Don't leave home without it! After the repair it'll be back to making bricks.

Wednesday, March 20, 2013

Foundations . . . Just Dig It

So in my last post I had estimated that I would need 614 bricks for the foundation. That works out to 4 courses of bricks and bedding joints. That makes the foundation 14 inches from the floor level. I ran string lines at the floor level and dug down measuring 14 inches. That puts the top of the foundation at the same level as the floor.


You can see in the pictures the string lines that I put up. I used these as a guide to measure from so that I can dig my foundation trenches at a consistent 14 inches. Anywhere that I didn't have a string to work from I was able to use a level to keep the depth consistent.


You can see in the following pictures all of the foundations dug out to 14 inches deep from the level of the floor and checked with a level to make sure the bricks can be laid level and evenly. Do to the slope of the ground the trenches closet to the house are much deeper than the trenches close to the large oven. There are a coupe of trenches where I will have to add more to the bedding to bring them up to the correct level. I'm not worried about adding to the trenches on the end because whatever I add will be underneath the level of the lower floor. I still have to lay out the rest of the lower floor but, I already know that it will be high enough to lock in the foundations from the upper floor.


I decided to go ahead and dig the full foundation all the way around all of the counters. This just makes the counters stronger. I'll be infilling the open space in the bottom of the counters plus 1 or 2 bricks so that the floor level inside the counters is higher that the main floor level. That way when I fill in the main floor there won't be any way for the foundation to shift.
As you can see in the pictures my dogs and cats are having lots of fun with the trenches for the foundations. I had to train my dogs as I was working to not cross the strings that I had put up. My cats however thought it was just a new playground for them.

I also collected all of the clay soil that I dug out for the foundations. I'll use it to make the bricks so none of it goes to waste.

Also just a quick note. Yes I know it looks like some of the trenches are crooked but, the bricks that I'm using are only 4 inches wide and the trenches are at least 6 inches wide so there is no issue.

Monday, March 18, 2013

Brick Estimation For Foundation Bricks

Well I'm at the point of needing to make the stabilized lime bricks so I can begin building the foundations. I'll use standard adobe bricks on top of the stabilized lime brick foundation. Now comes the part of my frustration. How to estimate the number of bricks that I'll need to make for the foundations. Well I naturally went online looking for a calculator to use. Man was that a frustrating waste of time. All I could find was calculators for bricks of set sizes like red brick or people just saying this is how any you should estimate.

So I decided to put together a spreadsheet that would allow me to enter all of the information to be able to estimate just how many bricks I would need. I'll make the form available for free to anyone that wants to use it. I hope it will help.

It's a very simple and plain form as you can see in the picture but, it works very fast to give you a pretty solid estimate. This form is designed to work with any custom sized bricks. Since we tend to make adobe bricks based on the size we need I thought it was important to make the custom size available in this form.

So what I came up with was needing an estimated 614 bricks. So how did I come up with that? I measured the exposed length of each side in inches. Then I added all of them together to get the total length. I then added the length of the brick at 10.5 inches plus the end joint of 0.5 inches giving me 11 inches. I took the total length of 1661 inches and divided that by 11 inches. I figured that at my deepest point I would need a minimum of 12 inches of foundation. This rounds up to 14 inches for 4 rows of bricks. So I took 1661 bricks divided that by the 11 inches and multiplied that by the 4 rows. I also factored in a few extra bricks in by figuring 5 bricks multiplied the number of rows and then divided in half giving me 10 extra bricks. This gave me a total number of bricks of 614. I also rounded up all the number of bricks so that I would have a few extra rather than not enough since a bricks sometimes break.

I am making the brick estimation form available for download for anyone who might find it useful. I saved the spreadsheet form in 2 formats to make it easier for people to use. The first format is .ods from LibreOffice Calc and the second format is .xls from Microsoft Excel. I used the older Excel version to try and make it more compatible.

Brick Estimation Form.ods

Brick Estimation Form.xls

{These links have now been deactivated. A new enhanced version of this form has now been posted. Please check the post dated April 3rd, 2013 for the links to the updated version 2 of the Brick Estimation Form.}

I have tested both of these spreadsheet forms with Google Sheets as well and they both work. I hope this form makes it a little easier for any brick project that you may have.

Please also take into consideration if you plan to build your wall a brick and a half thick, 2 bricks thick or more and adjust the wall thickness on the form to get the correct estimate. Also keep in mind that this form is designed for walls and not solid filled in spaces such as the hearth of a fireplace or base of an oven. To get a better estimate some changes in the calculations would need to be made.

Also please keep in mind that this form is for estimation purposes and that every design is unique. This brick estimation form has not been designed to estimate circles or domes but, that option could be added if needed later.

Thursday, March 14, 2013

Don't Mess With Mother Nature


What a picture! I definitely think that the title of the post says it all. I had planned on laying up some bricks and working in the yard today but, as you can see mother nature had her own ideas. So I will have to wait this weather out before I can get back to making bricks. Hopefully this will be the last storm for a while so I can have the time to get the bricks made.

For those of you who live in other places this picture is proof that even in the low desert it does get cold. I took this picture at just after 1 PM MST. Yesterday it was almost 80 F at this time and today it's only 57 F and dropping. Yes by the way, that is hail failing from the sky and bouncing off of the oven. It's been raining on and off all day but, right now the thunder is rolling and hail is coming down with some extreme force. Ya, I'm not going out in that if I don't have to. We've got winds of around 20 MPH as well. So I'm staying inside today and will probably wait for 1 or 2 days for everything to calm down and dry out before I go back to making bricks. I'll post more then. I hope everyone else out there comes through this storm with little to no problems.


Follow up to the first half of the post.

By 3 PM the temperature has fallen the 46 F and we're having wind gusts hitting about 50 MPH and the ground was so saturated that we have small lakes 3 to 4 inches deep in places. The winds again ripped off more shingles from the the roof. So I'll have to replace the missing and damaged shingles after the storm clears. The yard is a mess with debris blown all over. So there's a lot to clean up. So it may be several days before I get back to making bricks and doing more work on the outdoor kitchen.

You know, besides all of the storm damage and debris what really ticks me off about this storm is that it knocked all of the flowers off of both of the nectarine trees and the apple tree that had just started to bloom earlier this week. So that means we may not get much fruit from them this year. Dang, I was really looking forward to the fruit this summer. Like I said in the title, don't mess with mother nature.

It's weather like this that makes us need a roof to protect the adobe and cob that I'm using to build the kitchen. Without a roof with this much rain it the kitchen wouldn't last very long. This is why I am planning a roof. If you are building a kitchen of you own I would highly recommend a roof for you too. Keeps shade in the heat and keeps the rain off making your kitchen usable most of the year and make it last for years to come.

Monday, March 11, 2013

Sand, Sand And More Sand


Wow what a day! As you can see in the picture I just finished unloading sand. This was my second trip to the wash. I want to make a comment about the weight of sand. I know we don't think about it much but, sands weighs a lot. I borrowed my friend's truck this time to get the sand so I didn't have to make a bunch of trips. A big word of cation here, pay attention to the truck tires! I didn't know that the air pressure in the tires was low. So I got less than half of the truck bed loaded with sand and then noticed the tires were flattening. Oh that's bad! So I very quickly stopped loading the truck with sand and then slowly drove the truck home. After I emptied out the first load I checked and added air to all of the tires.  Then I went back and got a second load of sand. This time I filled the truck bed about 2/3 full, just to be safe. The truck drove much better and handled the load of sand much better with the extra air in the tires. So just remember to check your tires before you go down and start filling up the bed of your truck.

I am going to start laying up my foundation bricks and then more adobe for the rest of the counters. I have more clay earth in my yard than I could ever know what to do with but, sand is a different story. So I go down to the closest wash and get my sand. For those of you wondering if this is legal I called both the county and ADOT to ask if I could collect the sand. I was told that as long as it wasn't put there for use by the county or ADOT and it was on the side of the road then yes it was legal to collect.

Since the local wash flooded really bad over the winter it placed large amounts of clay and sand on the roadway. That sand and clay was then scraped off of the road and just placed on the side of the road. When I say large amounts I'm talking about piles 4 feet high for about 60 feet on either side of the road. For making adobe bricks this is a gold mine. I think I could build an entire house with the sand sitting on the side of the road. Just to put it in perspective for you, the picture of the pile of sand was dug out of a section of 1 pile. I dug a hole into the pile about 5 feet wide and less than halfway through the pile.

So with that I figure I should have access to plenty of sand. With that in mind my next step is to begin making the foundation bricks. My foundation bricks will be the standard adobe brick clay, sand and straw mix but, I will also include some slacked lime in the mix. By adding the lime, clay and sand together that is the recipe for the classic Roman cement. I'll be adding the chopped straw for additional strength in the bricks. This will work well as a foundation and be water proof. I used the same type of bricks as the foundation bricks for the outside wall of the base for the large oven. They have held up and worked great. As I already mentioned before I will use red brick for the entryway and step so as to protect the floor from wear or damage on the corners.

I want to point out that the mortar that I will be using for the red bricks and the lime stabilized bricks will be a clay, sand and lime mix. This will allow all of the bricks to bond well. I will switch to the standard clay and sand mix for all of the other bricks.

Now I need to measure the perimeter so I can figure out how many lime stabilized bricks I'll need, then it's time to begin making bricks.

Friday, March 8, 2013

Moving On To The Next Step

Well I figured out the locations the water lines and drain line. Yes I said drain line. I have decided to omit the second sink. Why you say? Well as I stood and looked at the staked out layout of the kitchen I had a realization. Why do I need 2 sinks outside? I have a sink inside the house and a sink outside should be just fine. So with that thought in mind I nixed the second sink. I am however going to add a hose valve spigot on the outside of the wall of the corner counter on the right side instead of the sink. I will also be running a water line and adding another hose valve spigot in the area between the smokehouse and the hot tub.


You can see in the picture that I've laid out where all of the water lines and drain lines will go in red. I haven't dug them deep at all because I only need the trenches dug down just deep enough so that the drain can maintain a descending angle of 1/4 inch over 4 feet. Our frost line is very shallow here. I have some irrigation lines in my hard that are in places only a couple of inches deep and they have never frozen. Now if you are building in a colder area and you are using water lines make sure to insulate them and install them below the frost line. The last thing you would want is to have a water line freeze and burst underneath you floor.

My plan is to add a tee (T) to the drain pipe under the sink in the inside kitchen from the sink in the outdoor kitchen. That way I can use the same drain pipe without having to add more. If you were building a kitchen in an open area or an area away from any drains I would think that you could treat the water from the sink as grey water and run your drain to trees, bushes or other plants that you anted to water. If you do that just keep in mind not to put anything down the drain that would hurt the plants.

I have also spent time at my local home improvement store and I have decided to use PEX tubing for the hot and cold water. I can buy the tubing in roles of 100 feet for about $27.00 US as opposed to about $20.00 US for 10 feet of copper tubing. Since keeping costs down to a minimum is part of my focus I decided that the PEX tubing is the most economical option. I will admit however that I would prefer copper and that I would use it if I had the extra money. For the money the best option does seem to be PEX tubing and since it is rated for both indoor and in ground that should work. One word of caution about PEX tubing. It is sensitive to UV (Ultraviolet Light) light. So you can't use the PEX tubing in a place where it would be exposed to sunlight. So you run the PEX tubing inside walls, under your house, under the kitchen floor in the ground or even up inside the counters but, you have to attach and convert to a solid pipe, like a short piece of copper, that can be exposed to sunlight and the elements anywhere you want to have a hose valve spigot or any other exposed fixture or connection.

I have seen other people use PVC, CPVC, steel pipe, and even the black poly irrigation pipe. You can use whatever you want and whatever is available to you. For reasons of cost and availability I chose to go with the PEX tubing but, you can choose anything that works for you.

Wednesday, March 6, 2013

The Layout

Well I finished clearing out the kitchen space as I had posted and then started figuring out my layout for the kitchen. Man was that a pain! As it turned out my digitally measured layout file was originally done with Microsoft Visio software. Well here's the rub, when my computer crashed the last time while I was running Windows and I had had enough. So I decided to completely convert over to Linux and I've been running Ubuntu Linux ever since. However it turns out that all of the information and measurements stored in the Visio file is now no good to me since I can't find a Linux application that reads my Visio file.

So in order to get any usable measurements I printed out the kitchen plan layout images that I have on the blog, got my tape measures and pulled out my old drafting tools. I took some reference measurements from the house to the large oven. Then used the architectural rulers to determine the measurement units to use on the printout so that I could convert it to inches and feet to use on the ground. This was a pain since the scale of the printout wasn't exact anymore because, when I printed it my printer automatically scaled the image up to the size of the paper. So I had to some estimating to do as well. I figured what the heck, it's my kitchen so I can make adjustments.


You can see my rough layout in the picture. I left a 4 foot walkway between the fireplace and corner counter to make it nice and easy to walk through. I also left 4 feet between the island and the house for the same reason. I left 3 feet between the right side of the island and the fireplace/counter and 5 feet between the back of the island and the barbecue/ wood stoves. I wanted enough room for 2 people to be able to walk around in the cooking area. It's hard to see in the picture but, I also marked the space for a 1 foot front overhang for a cantilevered counter top bar on the island.


In this picture you can see where the level of the house foundation is. This is going to be the same height of the floor of the kitchen all the way back to the last wood stove. I'm going to put a step in there to lower the floor level for the large wood oven and smoke house. Since I'm going to build up I won't need to dig much for foundations as the floor will act as one large foundation. The front exposed side will have a small foundation of lime stabilized adobe bricks to provide water protection to the outdoor kitchen and floor. Thankfully when it rains here only the top few inches get soft so 1 or maybe 2 layers of the lime stabilized adobe bricks would be the minimum. I'll probably go with 3 layers of the lime stabilized adobe bricks just to be on the safe side, maybe.

For the front entrance way and for the step down by the wood stove I plan on using some recycled red bricks. I figured by using these it would protect the floor since the red bricks would take the brunt of the foot traffic on the edges of the 2 step downs. Since I happen to have a lot of red brick to recycle I figured this would be a good use.

Just a quick note about the red bricks. A friend and I took his truck out to the desert looking for some rocks to line his driveway with. However what we found was a pile of red bricks that someone had pulled up from a patio and just taken out to the desert and dumped. We loaded up his truck bed with all of the brick. There was so much that we completely filled a standard 4 foot by 8 foot truck bed. I found the urbanite (broken up pieces of concrete used as large flat stones) for the base of the large oven the same way. Just going out to the desert and finding the stuff that other people just took out and dumped. I've been told by other people that they've found cinder blocks taken out and dumped as well. So you never know what you'll find if you go look. I figure I saved about $400.00 US by salvaging all that red brick. I can deal with that. If you plan on building something like this my suggestion would be to keep an eye out. I figure that anytime you can save money, clean up the environment, reuse materials and get something very usable out of it is the ultimate in green building.

I still have to move out the old hot tub to layout the smokehouse and figure out what the level the lower floor is going to be. I'm also planning on running arches around the outside of the kitchen as support for the roof over the kitchen and ht tub area. I figure the arched walls will also function as a partial wind block. In the summer time here in Arizona that is huge when we get the monsoons and sandstorms. It would make the outdoor kitchen even more usable during the summer and provide some privacy screening which I know my wife would like.

So that's where I'm at so far and what my plans are. I'll post more soon.

Monday, March 4, 2013

Clearing Out The Kitchen Space Update


So just a quick update on my clean up progress. You can see in the picture to the left that I got all of the stuff moved as well as all of the pavers. I have to say that it took more than I realized to move everything.

I spent the 2 days moving and hauling stuff to clear it all away but the worst part was pulling up the pavers. Wow, first off I didn't realize how much the ground under the pavers would act as a glue. Man were those pavers stuck down. It took a lot of force to pull them up. I also forgot just how heavy those pavers are, especially when they are stacked up. Thank god for heavy duty dollies!

The only issue that I'm worried about is that the hot tub will have to be moved. I think it may be too close to the oven to fit the smokehouse in between. I guess that's ok because the hot tub next to the house is going to be replaced with the one you can see in the distance in the picture anyways. Next I'll start measuring everything out and begin laying things out with stakes and strings.

Friday, March 1, 2013

Another Design Change

Ok I know that I just made a design change in the last post but, as I've been working outside and thinking about things I decided another design change was called for.

As you can see in this layout picture both sinks are separated and far away from any of the heat sources. Because of this little design flaw I decided that trying to include copper piping into the build to heat the hot water isn't going to be very doable for me.

I did some quick measurements and realized I would need about 70 feet of copper pipe and drain pipe just to run hot and cold water to both sinks. If I were to also add the copper pipes within the build around the oven, stoves and fireplace as I had originally planned I figured out that I would need about another 200 feet of copper pipe.

Well that was a bit of a shock to me. I had never figured that it was going to take so much copper pipe to do this. The sad thing here is that it's cheaper to add two small 110 Volt instant water heaters, one under each sink, than it is to buy all of the pipe.

So after looking at all of my options I have decided to omit the extra copper water pipe from my design. I've decide that I'm only going to use enough pipe to run the water to the sinks. In the future after I've built the outdoor kitchen I may add an instant water heater to the sinks. If I were to have a different space to build another kitchen I would likely try and design it so the sink and heat source were adjacent.  That way I could use the excess heat to heat the water as I had originally planned.

Thursday, February 28, 2013

Small Design Change

Since my last post I've been slowly working on cleaning up and clearing out all of the stuff that is in my way. While I was working on cleaning up all of the stuff I had a thought, "Why not build my smoker here in the outdoor kitchen instead of further back in my yard like I was originally planning?".

See my original plan was to build an adobe brick smokehouse in the back of my yard. I never really thought about it putting it anywhere else. I have no idea why I didn't but, it suddenly made perfect sense to put the smokehouse with the rest of the outdoor kitchen.

So after thinking about I decided that placing the smoker next to the large oven would be best. You can see in the picture above where I added the smoker.

I plan on using the space between the large wood oven and the body of the smokehouse to build two fireboxes. One firebox will be built right into the bottom of the smokehouse to be used for hot smoking. The second firebox will be built away from the smokehouse to be used for cold smoking.

I figure that by placing the smokehouse in the outdoor kitchen it makes it more accessible and usable. Plus I have plans on using the smokehouse regularly so this will make it much more convenient. Plus having access to both the outdoor kitchen and the indoor kitchen so close should help greatly.

So my next step is to finish clearing the last of the stuff in my way and remove all of the pavers that we had previously put down. Then I can make work on stakes and strings to mark everything out for the final layout before I start digging trenches for electrical and plumbing.

Monday, February 25, 2013

Clearing Out The Kitchen Space

Well Like I said in my last post, I have a lot of work to do to clear out the kitchen space to get started on the rest of the kitchen. If you're anything like me you have so many things going on all at once there just never seems to be enough time in the day to get to everything. Add to that trying to deal with my injuries and sometimes it just takes me way to long to get to things. For those of you that have teenagers you also know what it's like to try and get things completed. As my father and grandfather used to say, it's like pulling hen's teeth.


As you can see in the picture above I have lots of stuff that needs to be cleaned up and taken care of before I can even start laying things out for the rest of the kitchen. It's also very hard to see in the picture but, there is pavers laid down to make a patio that is about 20 feet by 25 feet. The fun part of removing the pavers is that we laid them directly into the slightly wet soil and they are held down and as solid as concrete. I may have to soak them with water just to get them to release since our soil here dries so hard.

When I get all of this moved out and cleared I'll start the laying everything. Once I get all of the layout done I'll be able to get a rough estimate of how many bricks I'll need to make as well. I'll also layout the trenches for the plumbing and electrical that I want to put in.

I'll post pictures as soon as I get things cleared and when things are laid out.

I'm including this just to show that things happen in life and no matter how bad things look right now you can always make something good out of it, as long as you're willing to do the work.

Thursday, December 30, 2010

And So It Begins

Well by now hopefully you've read the previous posts so you'll have the advantage of knowing the things that I had to figure out. Don't get me wrong there are lots of websites and videos out there but, they all seemed to miss bits of information and for what ever reason no one seems to build more than an oven or a counter to put in a barbecue insert. A big part of my reasons for writing this blog was to fill in some of the gaps in the available information as well as to add to the available information with my ideas and experiences that will hopefully along the way help someone else.

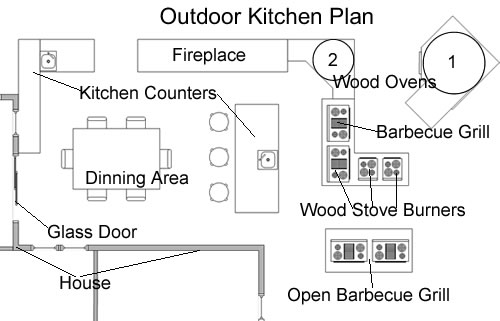
So hopefully by now you are planning your outdoor kitchen. The easiest way to do this is to start with a simple sketch or line drawing. If you have drawing software you can use that. The idea here is to get your ideas on paper. This will help you organize your thoughts into a cohesive plan that will work for you, your style of cooking and your particular location. Below is my current plan that I am working from. I say current because I've changed and adjusted the plan about a dozen times. This current plan revision has been measured out and adjusted to fit the space accordingly.


I marked the ovens on the plan with 1 and 2. The 1 notates the large oven. This is the first oven that we built and the starting point for this blog. The 2 is a planned second oven but, this one is to be smaller so when we are not cooking the big meals an oven is still available without having to fire off the large oven each time. The Barbecue grill is going to be mounted as an insert into the counter. I already own a large charcoal/wood barbecue that I plan to modify and put in as the insert. The wood stove burners I plan on building are of a very fuel efficient design. The open barbecue grill will be for those large pieces of meat or roasted vegetables. The fireplace will do several things in this design. First it will provide a place to build a fire to warm the dinning area. Secondly the fireplace will act as a privacy wall making this area more of a room than an open area. Lastly the fireplace will act as a wind block for the cooking area. The kitchen counters are for preparing and serving food. The center counter will be designed with a high and low side to the counter to accommodate bar dining. I plan on running conduit and plumbing as I'm building so that I can have electricity and water in the cooking area.

Now let me throw in another twist to my design. I am planning on adding copper piping on both ovens, the barbecue grill and around the stove burners. OK why would I want to do this? Well I figure that if I have to burn wood why not pass the water through pipes to heat it for hot water in the sinks. Why use a tank and electricity when the fire is already burning?

So as you can see there are many things to consider before you ever start building anything. Take the time and plan your kitchen area well so you'll be happy how things turn out and you'll use it happily for years.